Showing posts with label Breads. Show all posts

Sunday, June 22, 2014

Baked Chocolate Glazed Doughnuts


I warned you when I started making gluten free doughnuts, that they were dangerously too easy to make. My third batch of doughnuts is Baked Chocolate Glazed Doughnuts, a small twist on Jeanine's Baked Chocolate Doughnuts. I cut the sugar in the doughnut batter recipe in half, and didn't taste a difference. Instead of frosting with chocolate frosting, I whisked together an easy glaze to dip the cooled doughnuts in. The glaze has a nice vanilla flavor which complements the baked chocolate doughnut nicely.

Doughnut Glaze Recipe:
·1 cup powdered sugar
·4 TBS skim milk
·3/4 tsp pure vanilla extract
·Squeeze of fresh lemon juice

Whisk ingredients together in a bowl, then dip cooled doughnuts in the glaze. Set on a cooling rack (with a piece of parchment paper or silicone baking mat underneath) until serving.

Sunday, May 11, 2014

Gluten Free Baked Lemon Glaze Doughnuts


Ever since trying Jeanine's recipe for Gluten Free Baked Chocolate Doughnuts a month ago, I’ve been anxiously waiting to try another doughnut flavor. I’m afraid overjoyed that baking gluten free doughnuts is so easy that it’s become an every few weekends breakfast tradition in our house.
I'm a chocoholic, so while I prefer the chocolate doughnuts over the lemon doughnuts - the lemon doughnuts did not disappoint. They're sweet, tart, and the light lemon flavor was perfect for the spring-like Saturday morning we made them on last weekend.
What's your favorite donut flavor? I’m thinking Coconut or Maple Bacon are going to be the next doughnut flavors for me to try.

Sunday, December 29, 2013

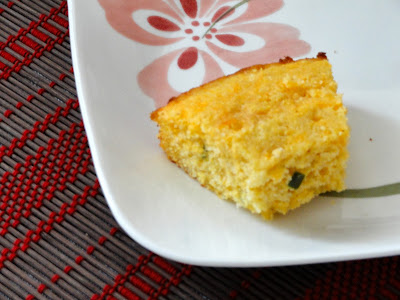
Jalapeño Cheddar Cornbread


Jalapeno Cheddar Cornbread is the perfect accompaniment to chili during the colder fall and winter months. This recipe comes together easily and the outcome is classic cornbread with a cheesy, spicy twist.


Jalapeño Cheddar Cornbread

Ingredients:
·1 cup rice flour
·¾ cup cornmeal
·3 TBS sugar
·2½ tsp baking powder
·¾ tsp salt
·1 TBS butter
·2 eggs, beaten
·1 cup skim milk
·¼ cup extra virgin olive oil
·1½ cup shredded cheddar cheese
·1 jalapeño pepper, chopped

Directions:
Preheat oven to 400˚. Combine flour, cornmeal, sugar, baking powder, and salt in a medium bowl.

Place butter in a 10-12 inch cast-iron skillet or round baking pan. Place in oven for about 3 minutes, or until butter melts. Remove pan from oven and swirl butter in the pan to coat the bottom and sides of the pan.

In a small bowl, combine eggs, milk, and olive oil. Add egg mixture to the flour mixture; stir until just moistened. Fold in cheddar cheese and jalapeño. Pour batter into the buttered, hot skillet.

Bake for 15 minutes, or until a toothpick inserted in the center comes out clean.

Monday, December 23, 2013

Amish Mystery Biscuits


I hope you and your family have a very, Merry Christmas!

This recipe comes from my mom's kitchen and you must try it. It's a new family favorite recipe, loved by everyone and requested for breakfast every time I'm home. My favorite way to enjoy Mom's Amish Mystery Biscuits is for Biscuits and Gravy, but they are delicious to enjoy any way you'd normally use biscuits.

Amish Mystery Biscuits

Ingredients:
·2 cups gluten-free flour blend
·1 TBS baking powder
·1 tsp sugar
·Pinch of salt
·¼ cup olive oil mayonnaise
·1 cup milk

Directions:
Preheat oven to 375˚. Combine gluten-free flour, baking powder, sugar, and salt in a large bowl. Make a well in the middle of the bowl and dump in mayonnaise and milk. Stir until it forms into a play dough batter. Do not overmix! Pat out and cut biscuits or drop formed blobs into a greased muffin tins. You can also brush the biscuits lightly with milk before baking. Bake for 12-16 minutes.

Monday, August 6, 2012

GF Banana Chocolate Chip Muffins

GF Banana Chocolate Chip Muffins are As Good As Gluten. I don't think gluten-eaters would be able to tell that these muffins are gluten free. I love anything banana and chocolate, including these muffins. They are sweet with a hint of cinnamon in every bite. And, they are made with brown rice flour making them whole grain and healthier than other gluten free flour blends.

Click here for the recipe from The Wannabe Chef


I've also shared this recipe on: Slightly Indulgent Tuesday, Gluten Free Wednesdays

Thursday, May 24, 2012

Homemade Corn Tortillas

The texture of Homemade Corn Tortillas is soft, yet crisp. I had forgotten what it was like to taste a real tortilla; it is so much better than a store bought shell.

I once wondered why I should bother making homemade corn tortillas when I can buy store bought corn tortillas relatively cheaply. I thought it would be difficult and I would need a fancy tortilla press. I thought wrong! Once I had my process down, Homemade Corn Tortillas were quick and easy to make. They don’t require any additional kitchen appliances and taste A-MAZ-ING!

Before I was gluten free, I used to love soft flour tortillas. Homemade Corn Tortillas have a softer texture than store bought corn tortillas. I am super excited to have the flavor of a corn tortilla shell with a softer texture that is gluten free. Bye-bye store bought tortillas, I’ve converted to making Homemade Corn Tortillas!

The recipe is so simple that it is often written on the bag of instant corn masa flour and it only requires two ingredients. The process I use for making Homemade Corn Tortillas is different than what was written on the bag of corn masa. I tried following the process written on the bag, but it didn’t work for me so I came up with my own easier method.

Homemade Corn Tortillas
Ingredients:
·2 cups instant corn masa flour
·2½ cups warm water

Directions:
Mix instant corn masa flour and water in a bowl; kneed for 4 minutes. Divide dough into 16-18 small portions. Preheat a griddle and place a few dough balls on the griddle. On the griddle, flatten each dough ball into a 6-inch circle using the back of a lightly greased spatula. Cook the tortilla for 20-30 seconds on each side.

Serve immediately or store in an airtight container.

Friday, March 30, 2012

BBQ Portobello Pretzel Burgers

BBQ Portobello Pretzel Burgers are amazingly delicious and super flavorful.

I've mentioned before that my husband's favorite burger at a local restaurant is the Pretzel Burger. I've never been able to enjoy the burger with the pretzel bun, so instead I recreated a gluten free and vegetarian version at home. I have to admit it's pretty awesome. A salty and savory pretzel bun is combined with meaty mushrooms, cheddar cheese, onions, and sweet BBQ sauce. Yum!

BBQ Portobello Pretzel Burgers
Ingredients:
·1 TBS extra virgin olive oil (EVOO)
·2 large portobello mushroom caps
·Salt and pepper
·2 TBS balsamic vinegar
·2 slices cheddar cheese
·Gluten free BBQ sauce
·Sliced onions
·2 homemade pretzel buns

Directions:Remove stems and gills from the mushroom caps. Gently rub with a paper towel to remove any dirt. In a medium skillet over medium heat, add EVOO and mushroom caps. Season mushrooms with salt and pepper and sauté for 5 minutes on each side. Pour 1 TBS of vinegar on top of the mushroom caps. When vinegar has evaporated, turn mushrooms cap side up and place a slice of cheese on top. Remove from heat and cover with a lid for a few minutes to let the cheese melt.

Cut the pretzel buns in half and slather with BBQ sauce. Place 1 portobello, cap side up, on top of each bun bottom. Top with onions and bun tops.

Yield: 2

Thursday, March 29, 2012

Gluten Free Soft Pretzels and Pretzel Bites

These Gluten Free Soft Pretzels taste like the real thing. They are soft, salty, and slightly chewy. My favorite way to enjoy them is to dunk them in homemade cheese sauce.

My sister has been making these gluten free pretzels for awhile and they taste like real soft pretzels should taste. Ever since I've had my sister's gluten free pretzels, I've been wanting to try the recipe with a healthier gluten free flour blend. I was so happy with the final outcome - they taste just as good as my sister's; definitely As Good As Gluten.

Before I watched my sister effortlessly make these delicious gluten free pretzels, I was intimidated by the recipe. It looked like a recipe for disaster with proofing the yeast, proofing the dough, and preparing a soda bath. It may look like a lot, but I promise if I can do it you can too!

As a bonus, this recipe is versatile. I recently made this recipe three ways - as soft pretzels, as pretzel bites, and as pretzel buns. Here are the cute, popable pretzel bites. I'll share the pretzel buns tomorrow.

Gluten Free Soft Pretzels, Pretzel Bites, and Pretzel Buns
Adapted from Jules Shepard

Ingredients:
·¾ cup brown rice flour
·¼ cup flaxseed meal
·⅓ cup plus 2 TBS potato starch
·1 tsp xanthan gum
·½ tsp salt
·1 package active dry yeast
·1 tsp granulated sugar
·⅓ cup warm water (110˚)
·1 TBS honey
·1 egg
·Extra virgin olive oil (EVOO)
·⅔ cup baking soda
·1½ TBS melted butter
·Additional toppings of choice (i.e., coarse salt, cinnamon and sugar)

Directions:
Preheat oven to 200˚. In a glass cup, mix warm water, sugar, and yeast. Let stand to proof for 5 minutes.

In a kitchen stand mixer bowl, combine remaining dry ingredients. Mix on low for one minute. Remove half of the ingredients to a separate bowl.

Add the yeast mixture, egg, and honey to the stand mixer. Beat on low speed for one minute, or until dry and wet ingredients are well-blended. Add the remaining dry ingredients and blend until well-mixed. If the dough is too dry, add an additional ½ to 1 tsp warm water.

Roll out dough into pretzels, pretzel bites, or form into buns. Place on a baking sheet lined with parchment paper. Liberally brush the pretzels with EVOO. Heat a damp cloth in the microwave for 30 seconds. Cover the pretzels with the cloth and proof in the warm oven for 30 minutes.

15 minutes before the proofing is complete, prepare a soda bath by combining baking soda and 10 cups of water in a large saucepan. Bring to a boil over high heat. Stir until soda is completely dissolved.

Remove proofed pretzels from the oven and preheat oven to 375˚. Once the soda bath is boiling, gently submerge the pretzels individually into the bath for 25 seconds, flipping over after about 15 seconds. Drain the pretzels and replace on the parchment-lined baking sheet.

Brush the pretzels with melted butter and top with salt or other toppings. Bake for 10-15 minutes, or until light golden brown.

Friday, March 23, 2012

Gluten Free Buttermilk Pancakes

Gluten Free Buttermilk Pancakes are fluffy, hearty, and tasty. Serve with your favorite pancake toppings, or stir in fruit or chocolate chips into the batter for endless flavor opportunities.

Before I was gluten free, I used to love having pancakes for breakfast on the weekend. Since becoming gluten free a year and a half ago, I've only had pancakes for breakfast a few times. I've been intimidated about making gluten free pancakes from scratch because in my pre-gluten free days I never made pancakes from scratch. I always used Bisquick. The few times that I've had pancakes since becoming gluten free have been with King Arthur Flour's Gluten Free Pancake Mix. How could I possibly make gluten free pancakes from scratch if I never made regular pancakes from scratch before? As it turns out, this task was actually easy.

Last weekend I put my intimidation behind me and made gluten free pancakes from scratch. And, I am so glad I did. My Gluten Free Buttermilk Pancakes are so good that I am kicking myself for not making gluten free pancakes from scratch sooner. The recipe I came up with is honestly an easy and delicious pancake recipe. The best part is that it requires only one gluten free flour ingredient that is healthy - brown rice flour. Enjoy!

Buttermilk Pancakes
Ingredients:
·1 egg
·1¼ cup buttermilk
·2 TBS butter, melted
·2½ TBS sugar or honey
·1¼ cup brown rice flour
·2 tsp baking powder
·½ tsp baking soda

Directions:
In a large bowl, beat egg until foamy. Add buttermilk and butter and mix until well blended. Add remaining ingredients and mix until well blended. Be careful not to over stir, it is okay if the batter is slightly lumpy.

Fry pancakes in a non-stick skillet for 3-5 minutes on each side.

Yield: 4 servings


I've also shared this recipe on: This Week's Craving

Friday, December 30, 2011

Garlic Cheese Breadsticks

I came across a recipe on Pinterest for Garlic Cheese Breadsticks. I used to love them before I became gluten-free. I couldn't get Garlic Cheese Breadsticks out of my mind, so I easily made a delicious gluten-free version. I love Garlic Cheese Breadsticks and I love recipe inspiration I find on Pinterest!

Garlic Cheese Breadsticks
Ingredients:
·1 recipe Gluten Free Pizza Dough (I use my GF Calzone recipe and roll it out into thick pizza crust instead of a Calzone)
·Extra virgin olive oil (EVOO)
·1 cup shredded mozzarella cheese
·1 TBS minced garlic, plus the garlic oil from the jar
·Dried Italian Seasoning

Directions:
Prepare Gluten Free Pizza Dough according to the recipe. Lightly brush rolled out dough with EVOO. In a small bowl, stir together shredded mozzarella cheese and minced garlic. Spread mixture over the top of the pizza dough. Season, to taste, with dried Italian Seasoning. Cook at 400˚ for 15-20 minutes.


Recipe inspired by Jam Hands

Monday, October 17, 2011

Adopt a Gluten-Free Blogger: The Baking Beauties

Wonderful Gluten-Free Sandwich Bread

I'm very excited to be hosting this month's Adopt a Gluten-Free Blogger Event. One of the "privileges" of hosting is having first dibs on who I'd like to adopt. I had the perfect blogger in mind...Jeanine of The Baking Beauties. I really enjoy reading Jeanine's blog. Her posts are well written, her pictures are always of high quality, and her recipes are mouthwatering!

The one recipe I had to try this month was Jeanine's Wonderful Gluten-Free Sandwich Bread. I tried making her bread recipe in the spring, but it flopped because I took it out of the oven too soon. The flavor was great so I new the recipe had potential, but I had been postponing trying the recipe again. Instead, I kept buying Udi's.

This time, I learned from my mistake earlier this year and followed the recipe very closely. The only change I made is that I used more potato starch to substitute for the tapioca starch. This time, I proofed my yeast for 5 minutes. This time, I dusted off my paddle hook for my pink KitchenAid stand mixer. This time, I let the bread dough rise in a 170˚ degree oven. Look, it really did rise!! (Please excuse the poor iPhone quality and kitchen lighting picture!)

 
After baking in the oven for 40 minutes in a butter greased, parchment paper lined pan, the bread was done! Take a look again at the delicious final product.


It lives up to my standards and is As Good As Gluten. It's even as good as Udi's. Actually, it's better than Udi's - the flavor and the texture! I'm so happy to no longer have to shell out $6 for half a loaf of frozen gluten-free bread at the store.

My husband always has the best comments about the gluten-free foods I bake. After I gave him a sample, he said, "That is damn good bread. Heck, even I would eat that bread. There is no aftertaste." Since I knew how good this bread was, I only gave him a small sample. He quickly asked for another bite, in which I responded, "No, you cannot have another bite. That is MY bread. You have your gluten bread from the store that you just had to have. This is all mine!"

I've enjoyed this bread in all ways possible - straight out of the oven with butter, smothered with homemade strawberry jam the next day, and (as the name suggests) as sandwich bread. Every way was delicious.

This bread definitely earns the word wonderful in its name. It's made out of healthy gluten-free ingredients. I know what's in it, and it is not all starch and sugar. The texture is perfect; it's like REAL bread! Oh, and the flavor. The flavor is phenomenal!

I'm beyond ecstatic with this recipe find. Thank you, thank you, thank you, Jeanine!


Sunday, October 16, 2011

Jalapeño Cheddar Corndog Muffins

Jalapeño Cheddar Corndog Muffins are the perfect side to serve with chili since the cornbread texture is ideal for soaking up extra liquid in fall soups/stews! I love combining the flavors of jalepeños, cheddar cheese, and hot dogs into one delicious cornbread muffin.

Jalapeño Cheddar Corndog Muffins
Ingredients:
·2 cups yellow cornmeal
·½ cup water
·1½ cups milk
·1 TBS lemon juice
·2 TBS melted butter
·1 egg
·1 TBS sugar
·1 tsp salt
·2 tsp baking powder
·1 tsp baking soda
·10-12 pickled jalapeño slices, chopped
·1 cup shredded cheddar cheese
·4 beef hot dogs, cut into thirds

Directions:
Preheat oven to 375˚. Grease 12 muffin tins with butter. In a large bowl, combine ingredients from cornmeal to baking soda. Stir well until no clumps remain. Fold in jalapeño pieces and cheddar cheese. Pour about ¼ cup of batter into each muffin tin. Place a third of a hot dog into the middle of each muffin tin, then bake for 20 minutes.

Yield: 12 muffins

Sunday, August 14, 2011

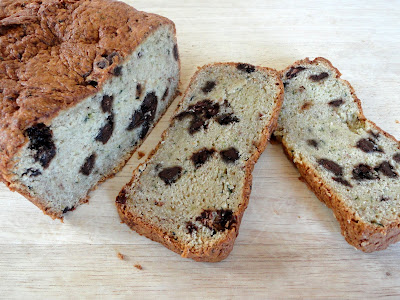
Chocolate Chip Zucchini Gluten-Free Quick Bread

The flavor in this Chocolate Chip Zucchini Bread is amazing! It tastes just like zucchini bread should taste with a hint of cinnamon and delicious chocolate chips. The texture is moist and As Good As Gluten. 

You may remember back in May I found the best Gluten-Free Quick Bread Base Recipe from Brittany at Real Sustenance. I've been wanting to try other flavor varieties, but haven't found the time since May. Last week, I bought a HUGE home-grown zucchini for 50 cents from a local stand. When my husband recommended I make zucchini bread, I knew this was the recipe I was going to use. It turned out perfectly, and I love that I can make any quick bread variety with one simple recipe!

Chocolate Chip Zucchini Gluten-Free Quick Bread
Recipe from: Real Sustenance

Ingredients:
·2 cups GF all-purpose flour
·1 tsp xanthan gum
·1 tsp baking powder
·1 tsp baking soda
·½ tsp salt
·¾ cup granulated sugar
·1 tsp cinnamon
·⅓ cup melted butter
·¾ cup milk + 1 tsp apple cider vinegar
·1¼ cup grated zucchini
·¼ - ½ cup chocolate chips 

Directions:
Preheat oven to 330˚. Grease loaf pan and set aside.

Prepare grated zucchini. In a large bowl, mix dry ingredients and then add wet ingredients. Mix well; the batter should be fairly thick. Stir in chocolate chips by hand.

Pour batter into prepared loaf pan and bake for 55 minutes, or until a toothpick inserted in the center comes out clean.

Allow the bread to cool for 5-10 minutes before removing from the pan. Enjoy!

I've also shared this recipe on: Seasonal Sunday

Thursday, June 16, 2011

GF Calzones

This GF Calzone is fluffy, moist, and simply delicious. I think I've created a phenomenal recipe; I love that it is crisp on the outside and soft on the inside!

However, this great recipe didn't come easily. It has taken me 3 tries to create the perfect gluten-free calzone recipe. It was totally worth the effort and frustration. The result of my first try was dough that was too sticky to roll out easily. This resulted in my creation of a semi-"scrambled" calzone on the pizza stone; however, the cooked dough tasted delicious! For the second try, I altered the ingredients to make the dough less sticky. Unfortunately, I made too many alterations because it was way too sticky to fold into a calzone and the flavor wasn't as good as the first attempt.

The third time was a charm! I went back to the original recipe with a few adjustments. I also learned the trick to working with sticky gluten-free doughs - grease, grease, and more grease! By grease, I mean extra virgin olive oil cooking spray. So, please take my suggestion to grease the parchment paper, your spoons, your hands, and your spatulas with olive oil cooking spray. I've learned this by experience! :)  I'm completely overjoyed with the delicious results of my third try! The GF Calzone rises nicely and, of course, tastes As Good As Gluten!

I made a Chicken Alfredo calzone (using my Low Cal Alfredo recipe) with green peppers, pineapple, and onions. The flavors complemented the calzone dough well. I've also made a calzone with marinara sauce, sausage, and onions and a three cheese calzone with tomato and basil, which both tasted delicious. The GF Calzone recipe below also makes a great pizza crust. 

GF Calzones
Ingredients:
·¼ plus 1/8 cup warm water
·1 package yeast
·¼ cup sugar
·Dash of salt
·1 tsp baking powder
·1½ tsp garlic powder
·1½ tsp onion powder
·1½ tsp Italian seasoning
·1¼ cup GF flour
·1 tsp xanthan gum
·1 egg
·1 TBS butter, softened
·¼ cup applesauce
·1½ TBS extra virgin olive oil (EVOO)

Directions:
Preheat oven and pizza stone to 400˚. Combine yeast and sugar with warm water to proof the yeast. In a large bowl, combine dry ingredients from salt to xanthan gum. Add egg, butter, applesauce, EVOO, and proofed yeast. Mix until well combined – the dough will be sticky.

Roll the dough out between two pieces of greased parchment paper (My photos are of 1 large calzone, which turned out great. But, from previous experience, it is easier to make 2-4 smaller calzones instead of 1 large calzone).  Peel off the top piece of parchment paper and add desired toppings to one side of the calzone dough. Then, fold the bottom piece of parchment paper (with the dough on it) over to cover the other half of the dough that has the toppings on it (essentially “folding” the pizza in half to form a calzone). Use the back of a greased spoon to form the edges and smooth out the top. Sprinkle the top of the calzone with additional spices/seasoning.

Carefully remove the hot pizza stone from the oven and sprinkle the pizza stone with corn meal. Using a greased spatula/turner, carefully transfer the calzone from the parchment paper onto the pizza stone. Bake for 15-20 minutes, or until the dough is cooked and the calzone is browned.

Yield: 4-6 servings

I've also shared this recipe on: Seasonal Sunday's

Saturday, June 11, 2011

Homemade Biscuits and Gravy

One of my favorite (occasional) weekend breakfast recipes is Biscuits and Gravy. However, it's been years since I've made it, I've never made it completely from scratch, and I've never made it gluten-free. A few weekends ago, I created a gluten-free homemade biscuits and gravy recipe from scratch, and Mike and I enjoyed a delicious breakfast!

I did learn one thing about making gravy from scratch - the taste depends on sausage grease. I'm not a fan of cooking anything in grease (remember when I discovered the secret to Mike's Chicken Bacon Ranch recipe was onions cooked in bacon grease)? Well, I had leftover pork sausage that was already browned, so I used it to make the gravy. Needless to say, I didn't have any of the sausage grease drippings and thought I'd be saving time and making a healthier breakfast (which I did) by not using it. My first attempt at this recipe tasted good; however, I, sadly, had to agree with Mike that it was mising the extra flavor from the sausage drippings. I wrote my recipe below the "right" way so we'll have the extra (unhealthy) flavor next time!

Homemade Biscuits and Gravy
Biscuit Ingredients:                                          Gravy Ingredients:
·1¾ cup all-purpose GF flour                            ·1 lb pork sausage
·1 tsp xanthan gum                                            ·1½ TBS cornstarch
·2 tsp baking powder                                         ·2 cups milk
·1½ tsp sugar                                                       ·Salt and pepper to taste
·½ tsp cream of tarter
·½ tsp salt
·5 TBS unsalted butter, softened
·1 cup milk

Directions:
Preheat oven to 450˚. In a large bowl, combine dry biscuit ingredients (from GF flour to salt). Cut in butter until mixture resembles course crumbs. Add milk and stir until dough mixture forms. Drop rounded balls of biscuit dough onto a cookie sheet lined with a silicone baking mat (or parchment paper). Bake biscuits for 12 – 15 minutes, or until tops are slightly browned.

Meanwhile, brown sausage in a large pan. If there is a lot of excess grease, drain some; keep at least some grease to add flavor to the gravy. Whisk in cornstarch and milk over medium heat. Whisk until desired gravy consistency is reached (may need to add more milk if it gets too thick, or more cornstarch if it is too thin). Add salt and pepper to taste.

Serve sausage gravy over warm biscuits.

Yield: 10-12 biscuits

Wednesday, June 1, 2011

Adopt a Gluten-Free Blogger: Lynn's Kitchen Adventures

For the May Adopt a Gluten-Free Blogger Event (hosted this month by Z's Cup of Tea), I decided to adopt Lynn at Lynn's Kitchen Adventures.  I've had a wide variety of Lynn's recipes bookmarked ranging from main dishes to desserts.  I love Lynn's blogs because she showcases a wide variety of delicious recipes that are easy to prepare, budget-friendly, and packed full of flavor. In May, I made Lynn's Homemade Vanilla Pudding, Mexican Chicken Lasagna, and Green Chili and Cheese Cornbread. Each one of these recipes is delicious!

Homemade Vanilla Pudding
Click here for recipe
You won't find a boxed pudding that is more flavorful than this homemade pudding recipe. I served over a layer of bananas with a spoonful of whipped cream on top for a delicious Faux-Banana Cream Pie Pudding Dessert.

I had no idea you could make homemade pudding from scratch until I came across Lynn's recipe for Homemade Vanilla Pudding. Even though it does take a little longer to prepare than boxed pudding, it is worth it for the natural ingredients and great flavor. Plus, it only took us 10 minutes - start to finish. I didn't have any cream, so I used all skim milk for the liquid and it still turned out well. I also used pure Mexican vanilla, which added a great vanilla flavor.

Mexican Chicken Lasagna
Click here for recipe
My husband and I love Mexican dishes, and this is a new favorite for us! We love the mild spice from the green enchilada sauce and the great texture and flavor of the chicken, black beans, and cheese layer.

When Lynn posted her recipe for Mexican Chicken Lasagna in March, I immediately bookmarked it. It sounded absolutely delicious, and it combined quite a few ingredients that I love. I'm so glad I decided to try this recipe because it is fantastic. Mike even agreed - "This is good. Really, really good actually!"

Green Chili and Cheese Cornbread
Click here for recipe

I've also shared this recipe on: Seasonal Sunday
There aren't too many cornbread recipes that I like, but this cornbread recipe is really, really good! It's moist and flavorful with corn, cheese, and green chilies.

Last week, we had a cold, rainy day. Mike made
Steak 'n Shake Chili with Venison, and I made the perfect accompaniment - Lynn's Green Chili and Cheese Cornbread. We both really liked the cornbread, and it will now be our go-to recipe for cornbread. Next time I make it, I'm going to increase the heat level by adding chopped jalapenos in place of the green chilies.


This month, I cooked my way through a few of Lynn's recipes I've been wanting to try. However, I didn't get to them all and have the following recipes on my list for another time:
Nut Free Homemade Granola, Mounds Bar Pie, Homemade Peppermint Patties, and Peanut Butter Baked Oatmeal.

In previous Adopt a Gluten-Free Blogger events I've made:

Kelly at 18 Hour Kitchen's Black Bean Cupcakes
Shirley at Gluten Free Easily's Flourless Pizza Crust AND Garlic Cheese Biscuits
Carol at Simply...Gluten Free's Cherry Cola Ribs

Sunday, May 15, 2011

Banana Chai Easy Gluten-Free Quick Bread

This Banana Chai GF Quick Bread is perfect; yes, perfect! The aroma is mouthwatering, the texture is moist, and the flavor is delicious!

When Brittany at Real Sustenance posted her recipe for Easy Gluten-Free/Vegan Quick Bread Base with Endless Flavor Possibilities yesterday, I had to try it immediately. I was ecstatic when I saw her flavor option for Banana Chai bread, because I had two rotting bananas on the counter and a box of Chai tea bags that didn't have the right tea flavor I was looking for.

I am so incredibly grateful that Brittany made 10 loaves in 24 hours in order to perfect the Easy Gluten-Free/Vegan Quick Bread Base recipe. I am also overjoyed with the endless flavor possibilities that are easy to make and don't require me to experiment to get the right ratio. I can't wait to get back in the kitchen and try more flavor varieties!


Banana Chai Easy Gluten-Free Quick Bread
Recipe from: Real Sustenance

*Note: You really need to visit Real Sustenance for Brittany's recipe for Easy Gluten-Free/Vegan Quick Bread Base with Endless Flavor Possibilities. Her post explains all of the hard work that went in to creating this fantastic recipe, and she also has many different options for the liquid ingredients below (including Vegan options). Not only will her post give you the complete "base recipe," but it also has some flavor possibilities to create delicious loaves of GF bread. In the recipe below, I'm simply posting the ingredients I used to make the Banana Chai GF Bread. At Real Sustenance, there are more options to make this version and other flavor varieties.

Ingredients:
·2 cups GF all-purpose flour (I also used Bob's Red Mill GF All-Purpose Baking Mix)
·1 tsp xanthan gum
·1 tsp baking powder
·1 tsp baking soda
·½ tsp salt
·¾ cup granulated sugar
·2 bags of Chai tea (cut tea bags open and add contents to the dry ingredients)
·⅓ cup melted butter
·¾ cup milk + 1 tsp apple cider vinegar
·1¼ cup banana puree

Directions:
Preheat oven to 330˚. Grease loaf pan and set aside.

Prepare banana puree. In a large bowl, mix dry ingredients and then add wet ingredients. Mix well; the batter should be fairly thick.

Pour batter into prepared loaf pan and bake for 55 minutes, or until a toothpick inserted in the center comes out clean.

Allow the bread to cool for 5-10 minutes before removing from the pan. Enjoy!

I've also shared this recipe on: Slightly Indulgent Tuesdays

Saturday, April 2, 2011

Brown Rice and Flaxseed Pizza Crust

I received a great book for Christmas - Easy Gluten-Free by Tricia Thompson and Marlisa Brown. This past weekend, I adapted the Brown Rice and Flaxseed Pizza Crust recipe from the book. Since following the GF diet, I've had a variety of GF pizzas including Udi's GF Pizza Crust, Pizza Fusion's GF Pizza, Chebe Pizza Crust Mix, and Flourless Pizza Crust. However, until now I haven't attempted to make a GF flour-based pizza crust from scratch.

This pizza crust recipe is hearty, healthy, and versatile. The texture is unlike any GF pizza crust I've had before - thick and fluffy, crisp yet soft. This new pizza crust recipe is As Good As Gluten and could easily make a deep dish pizza by cooking in a smaller pan or doubling the recipe. Because the pizza crust is made with hearty ingredients (brown rice and flaxseed), it does taste a little different than a non-GF white flour pizza crust. I think it still tastes delicious and reminds me of a whole wheat pizza crust I used to make in my pre-GF days.

I made a BBQ Chicken Pizza (recipe coming soon). I'll give you a sneak peak at the final outcome because you have to see how thick this pizza crust is! Seriously, does it even look like GF pizza?! I'm SO glad I tried this recipe. I like thin crust pizza (which is a good thing because so far the only GF pizza crusts I've had have been very thin and crispy), but I also like thick crust pizza (which is one food I miss from my pre-GF days).

Ingredients:
·½ cup organic whole grain brown rice flour (I use Bob's Organic Whole Grain Brown Rice Flour)
·½ cup ground flaxseed meal (I use Bob's Ground Flaxseed Meal)
·1 tsp baking powder
·¼ tsp salt
·1½ tsp garlic powder
·1½ tsp onion powder
·1 - 3 tsp of additional seasonings of your choice (see Notes section below)
·¼ cup water
·3 eggs
·3 TBS extra virgin olive oil (EVOO)
·½ cup cooked brown rice

Directions:
Preheat oven to 425˚. Line a 9x13 inch pan with parchment paper.

In a large bowl, mix the dry ingredients, from the flour to the onion powder. In a separate bowl, mix the wet ingredients, from the water to the EVOO. Slowly add the wet ingredients to the dry ingredients and stir until well combined. Let sit for 2-3 minutes then stir in the brown rice until well combined.

Using a spatula, spread the pizza dough on the prepared pan and bake for 15 minutes.

Remove pizza dough from oven and add the pizza toppings of your choice and cook for 15 additional minutes (or until crisp).

Yield: 6-8 slices

Notes: You can add spices to the dry ingredients to flavor the crust. For an Italian pizza, add 1 tsp of basil and 1 tsp of oregano, or 1½ tsp Italian seasoning. For a Mexican pizza, add 1 tsp dried cilantro. For a BBQ chicken pizza, add 1½ tsp chili powder.

I've also shared this recipe on: Create a GF Pizza Challenge, Seasonal Sunday

Friday, March 18, 2011

Adopt a Gluten-Free Blogger: Gluten Free Easily

Last month was my first month participating in the "Adopt a Gluten-Free Blogger" event. It was a lot of fun and “introduced” me to more fantastic GF bloggers! This month’s adoption is hosted by the creator of this great event – Sea at Book of Yum. I was anxiously awaiting the announcement of the March adoption because I knew exactly who I wanted adopt – Shirley at Gluten Free Easily (GFE). 

I've been following (and admiring) Shirley's blog and great recipes since I first became GF. I also recently nominated Shirley for the Versatile Blogger Award. To understand why I nominated her, all you need to do is look at her GFE Recipes page. I definitely have Shirley to thank for my Super Easy Pie Crust recipe. I only made one slight modification to her No Roll Never Fail Press in GF Pie Crust recipe, which is such an easy, delicious, and versatile recipe!

I've had fun making Shirley's recipes, and they all definitely live up to her name - Gluten Free Easily!

Flourless Pizza
click here for recipe
I’ve had Shirley’s Flourless Pizza recipe on my list to try for a few months. When I first saw the recipe, I was intrigued but hesitant to try Flourless Pizza crust. I finally got around to making it last weekend and am so glad I did. I made a sausage and onion Flourless Pizza and it tastes fantastic; definitely As Good As Gluten!

I loved Mike's quotes as he was eating a slice. After his first bite, he said "Oh my gosh, this is amazing!" After he was done, he exclaimed "That was delicious! Good work!" I must say that I feel the same way!

Here’s what the crust looks like after baking it in the oven for 20 minutes.


And, here’s what the final Flourless Pizza looks like after the crust has cooled and has been baked again with the toppings.


Garlic Cheese Biscuits
click here for recipe
Another GFE recipe I’ve had on my list is Garlic Cheese Biscuits. My husband loves Red Lobster, but I think we’ve only been there once together (there are limited options for someone like me who is GF and not a big seafood fan!). Mike’s been making fish for Friday night dinners during Lent, which provided a great opportunity to finally make Garlic Cheese Biscuits. I followed Shirley's recipe and took her advice in her "notes" section by adding the minced garlic to the biscuit batter before baking and omitting the extra butter.

These Garlic Cheese Biscuits are so flavorful, moist, and delicious!! And, of course, As Good As Gluten. This recipe is definitely going to be a new staple in our home, as there are so many dishes these biscuits would go well with!

I've also shared this recipe on: Seasonal Sundays